
Lower Spinal Decompression Exercises at Home
Back pain is one of the most common reasons people visit doctors, miss work, and reduce their daily activities. The lower spine, which is the lumbar region, carries the weight of most of the upper body and is involved in nearly every movement a person makes throughout the day. Over time, sitting for long hours, poor posture, carrying heavy loads, aging, and general wear and tear can compress the discs and joints of the lower spine. This compression is a major source of pain, stiffness, and in more serious cases, nerve symptoms like tingling, numbness, or shooting pain down the legs.
Spinal decompression is the process of gently creating space between the vertebrae to relieve this compression. When the vertebrae are separated even slightly, the pressure on the discs and nerves decreases, blood flow to the area improves, and the body gets an opportunity to heal. Professional spinal decompression tables and traction devices exist in clinics, but many of the same benefits can be achieved at home with the right exercises and movement habits.
This article walks through what lower spinal decompression actually means, why it matters, how the exercises work, and exactly how to perform a comprehensive set of home decompression exercises that are safe, effective, and practical for most people.
What Spinal Compression Actually Means and Why It Happens
The spine is made up of thirty-three vertebrae stacked on top of each other. Between most of these vertebrae are intervertebral discs, which are round pads of cartilage with a tough outer ring and a soft, gel-like center. These discs act as shock absorbers, distribute load across the spine, and allow the spine to move in multiple directions. They also maintain the spacing between vertebrae that keeps the nerve roots exiting the spinal cord from being pinched.
When the spine is compressed, this spacing decreases. The discs lose height, which can happen from dehydration of the disc material over time or from excess pressure. When disc height decreases, the nerve roots that exit between the vertebrae have less room and become vulnerable to irritation or compression. The facet joints, which are the small joints at the back of each vertebra, also come under increased load when the discs thin, which causes joint inflammation and arthritis over time.
Compression in the lower spine can come from several sources. Prolonged sitting is a major contributor because it places the lumbar spine in a position where the discs carry uneven loads for hours at a time. Poor posture, both sitting and standing, affects how weight is distributed across the spine. Excess body weight increases the overall compressive load. Tight hip flexors from prolonged sitting pull the pelvis forward, which increases the curve of the lower back and concentrates pressure on the posterior disc margins. Weak core muscles mean the spine lacks the dynamic support it needs and relies more heavily on passive structures like the discs and ligaments to carry load.
Sources and causes of lower spinal compression:
Here is the table format
| Cause | How It Creates Compression |
|---|---|
| Prolonged sitting | Causes sustained uneven disc loading and may reduce disc hydration. |
| Poor posture | Creates abnormal load distribution across the vertebrae. |
| Tight hip flexors | Can cause anterior pelvic tilt, increasing lumbar curve and posterior disc pressure. |
| Weak core muscles | Forces the spine to rely more on discs and ligaments instead of muscle support. |
| Excess body weight | Increases the overall compressive load on spinal discs. |
| Aging and disc dehydration | Discs naturally lose water content and height over time. |
| Heavy lifting with poor technique | Creates sudden spikes in spinal loading that may damage disc structure. |
How Decompression Exercises Help the Lower Back
Decompression exercises help the lower spine in several measurable ways. The primary mechanism is creating traction, which means gentle lengthening of the spine that temporarily increases the space between vertebrae. When this happens, the pressure inside the disc decreases, and this pressure differential actually pulls some of the disc’s hydrating fluid back in from the surrounding tissues. This rehydration process is important for disc health and long-term spine function.
Reduced disc pressure also means reduced pressure on any nerve roots that may have been compressed. For many people, the tingling, numbness, or shooting pain that travels down the leg, a condition often called sciatica, is caused by pressure on the sciatic nerve or its contributing nerve roots. Decompression exercises can reduce this pressure and provide significant relief.
Beyond the mechanical effects on discs and nerves, decompression exercises also stimulate blood flow to an area that has often been sitting in a compressed, relatively ischemic state. Improved circulation brings oxygen and nutrients to the disc and surrounding tissues, supports the removal of inflammatory waste products, and activates the healing process.
Dr. Stuart McGill, a professor of spine biomechanics at the University of Waterloo and one of the world’s leading experts on back pain, has noted in multiple research papers and his books that positions and movements that reduce spinal load are a critical component of back pain recovery. He emphasizes that the spine needs periods of unloading throughout the day, and that the body’s own movement patterns are among the most powerful tools for managing disc-related back pain.
Benefits of spinal decompression exercises:
| Benefit | Mechanism |
|---|---|
| Reduces nerve root compression | Increases intervertebral space, reducing pressure on spinal nerves. |
| Rehydrates intervertebral discs | A pressure drop may help draw fluid back into the disc. |
| Reduces muscle spasm | Gentle movement can calm guarding muscles around the spine. |
| Improves circulation | Increased blood flow helps deliver nutrients and remove inflammatory waste. |
| Reduces pain signals | Less mechanical pressure may reduce irritation of pain-sensitive structures. |
| Improves mobility | Loosens stiff joints and tight soft tissues around the spine. |
| Supports long-term disc health | Regular unloading may help reduce chronic stress on spinal discs. |
Before You Start: Important Safety Considerations
Most lower spinal decompression exercises are gentle and safe for the majority of people with common lower back pain. However, there are situations where you should check with a healthcare professional before starting a home exercise program.
If you have been diagnosed with spinal stenosis, spondylolisthesis, osteoporosis, or a fracture of the spine, some decompression exercises may not be appropriate or may need to be modified. If you have severe sciatic pain that is getting progressively worse, or if you have bowel or bladder changes along with your back pain, these are symptoms that require urgent medical evaluation rather than home exercises.
If you have recently had spinal surgery, you should follow the specific rehabilitation program your surgeon provides rather than starting a general decompression program.
For the vast majority of people who have typical lower back pain or disc-related pain without these more serious findings, home decompression exercises are a safe, effective, and practical approach.
General safety principles when performing decompression exercises:
Always move slowly and gently, especially when you are starting out. Stop any exercise that causes sharp, shooting, or worsening pain. Breathe consistently throughout each exercise. Do not hold your breath. Perform exercises on a firm but comfortable surface like a yoga mat on the floor. Start with the gentler exercises and progress to more demanding positions gradually. Consistency matters more than intensity. Daily gentle decompression is more beneficial than occasional intense sessions.
Conditions that need medical clearance before starting:
| Condition | Reason for Caution |
|---|---|
| Spinal stenosis | Some positions may reduce space in the spinal canal instead of increasing it. |
| Spondylolisthesis | Vertebral slippage may be aggravated by certain movements. |
| Severe osteoporosis | Fragile bones may be vulnerable even during gentle exercises. |
| Spinal fracture | Movement may worsen or displace the fracture. |
| Progressive neurological symptoms | May indicate active nerve compression that needs medical care. |
| Recent spinal surgery | Healing tissue needs specific medically guided rehabilitation. |
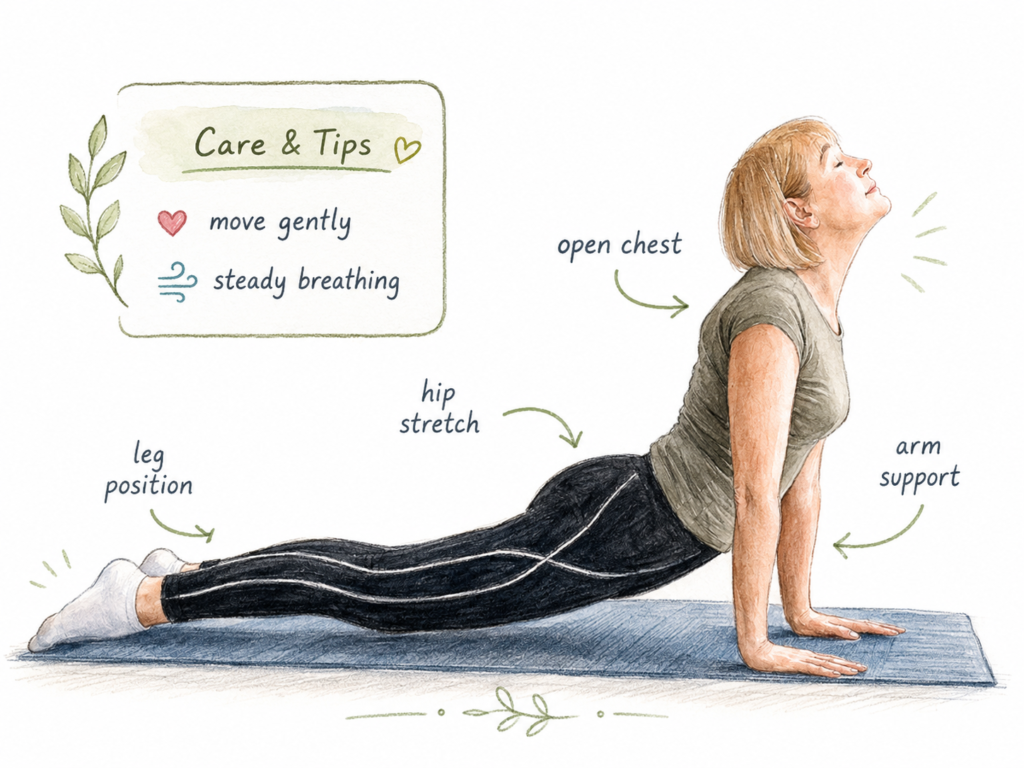
The Child’s Pose for Gentle Lumbar Traction
Child’s pose is a foundational yoga position that happens to be one of the most effective gentle decompression positions for the lower back. It uses body weight and the forward folding position to gently lengthen the lumbar spine, open the facet joints at the back of the vertebrae, and reduce pressure on the posterior aspect of the discs where most disc herniations occur.
To perform child’s pose, begin on your hands and knees on a mat. Bring your big toes together so they are touching, and then spread your knees apart to roughly the width of your hips or slightly wider if that is more comfortable. Sit your hips back toward your heels. Extend both arms forward on the mat and lower your torso down between your thighs. Let your forehead rest on the mat. Take slow, deep breaths and feel the lower back gently expanding with each inhale.
The key to getting decompression benefit from this position is to focus on reaching the arms forward while simultaneously sinking the hips back toward the heels. This opposing movement creates the lengthening traction effect throughout the lumbar spine.
Hold the position for sixty to ninety seconds, focusing on relaxed, deep breathing. Take three to five slow breaths and allow the body to settle deeper into the position with each exhale. You can repeat this two to three times.
A useful variation is to walk the hands toward one side and hold there for thirty to forty-five seconds before returning to center and walking to the other side. This adds a lateral flexion component that targets the facet joints and disc spaces on each side of the spine.
Child’s pose tips and modifications:
| Tip | Application |
|---|---|
| Place a folded blanket between thighs and calves | Helps if hip or knee tightness limits the position. |
| Rest forehead on stacked fists | Keeps the neck in a neutral position if the forehead cannot reach the floor. |
| Walk hands further forward | Increases the stretch and traction through the lumbar spine. |
| Use slow, deep breathing | Each exhale allows the body to sink deeper into the position. |
| Duration | Hold for sixty to ninety seconds, two to three repetitions. |
The Supine Knee-to-Chest Stretch for Disc Relief

Lying on your back and pulling both knees to your chest is a simple, gentle exercise that many people instinctively do when their lower back hurts. There is a good physiological reason for this instinct. This position flexes the lumbar spine, which opens the facet joints and increases the space between the posterior aspects of the vertebrae. It also gently stretches the erector spinae muscles along the back, which are often in spasm when the lower back is compressed and painful.
To perform the double knee-to-chest stretch, lie on your back on a firm surface with both legs extended. Slowly bend both knees and bring them toward your chest. Wrap both arms around your knees or hold the backs of your thighs. Pull your knees gently closer to your chest until you feel a comfortable stretch in your lower back. Hold for thirty to sixty seconds while breathing deeply and slowly.
The single knee-to-chest version offers a slightly different benefit. Lying on your back, bend one knee up toward your chest while keeping the other leg extended on the floor. Hold behind the bent knee with both hands and pull gently. This stretches the hip and lower back on one side at a time and can help identify if one side is tighter or more restricted than the other. Hold for thirty to forty-five seconds on each side.
An important variation that adds gentle rotation is the supine twist. From the knee-to-chest position with both knees bent, let both knees fall to one side while keeping the shoulders flat on the floor. The lower spine gently rotates, which mobilizes the facet joints and stretches the muscles and ligaments on the opposite side of the spine. Hold each side for thirty to sixty seconds.
Knee-to-chest exercise variations:
| Variation | Target Area | Duration |
|---|---|---|
| Double knee-to-chest | Overall lumbar flexion decompression | Thirty to sixty seconds |
| Single knee-to-chest | One-sided lumbar and hip flexor stretch | Thirty to forty-five seconds each side |
| Supine spinal twist with both knees | Rotational mobilization of the lumbar spine | Thirty to sixty seconds each side |
| Supine twist with straight top leg | Greater rotational stretch | Twenty to thirty seconds each side |
Hanging Lower Spinal Decompression Exercises Using a Pull-Up Bar or Door Frame
Hanging is one of the most direct ways to decompress the entire spine through gravity-assisted traction. When you hang from your hands, the weight of your pelvis and legs creates downward traction on the lumbar spine, drawing the vertebrae apart and reducing disc pressure.
Studies on axial spinal traction have shown that even partial body weight traction, where the feet maintain some contact with the floor, produces meaningful reductions in disc pressure. Full hanging where the feet are completely off the ground is more demanding and should be approached gradually.
To hang for spinal decompression, you need a sturdy overhead bar. A pull-up bar mounted in a doorway is ideal. Grip the bar with both hands slightly wider than shoulder width. Start with your feet maintaining some contact with the floor, which reduces the load on your grip and allows you to control how much of your body weight is being applied to the traction.
Relax the muscles in your lower back completely and let your hips drop down. You should feel a gentle lengthening sensation through the lower back. Breathe slowly and deeply. Begin with twenty to thirty seconds and build gradually over weeks to sixty seconds or longer as your grip strength and comfort allow.
If you cannot reach an overhead bar, a significant modification is to use the underside of a sturdy table or the side of a door frame to perform a partial supported hang or lean-back traction. This does not provide the same degree of decompression but can offer some benefit.
Hanging decompression tips:
Start with feet partially touching the floor to control the traction intensity. Use a towel or padded gloves to improve grip comfort. Relax the entire lower body consciously, letting the pelvis sag downward. Begin with twenty to thirty seconds and build gradually. If you feel any sharp pain, bring your feet back to the floor immediately. Perform two to three hangs per session, resting between each one.
Hanging decompression progression:
| Stage | Position | Duration | Who It Is For |
|---|---|---|---|
| Beginning | Feet lightly touching the floor | Fifteen to twenty seconds | Those new to hanging or with significant pain. |
| Intermediate | Toes lightly touching the floor | Twenty to forty seconds | Those with some hanging tolerance. |
| Advanced | Full hang with feet off the floor | Forty to sixty seconds | Those with good grip strength and tolerance. |
The Cat-Cow Movement for Dynamic Decompression
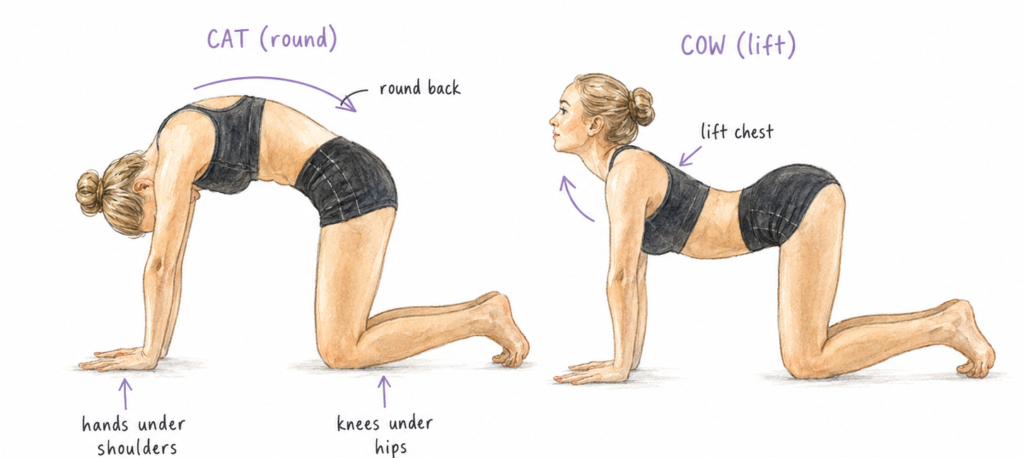
Cat-cow is a flowing movement between spinal flexion and extension that works differently from static holds. Rather than creating sustained traction, it uses gentle, rhythmic movement to pump fluid through the discs, mobilize the facet joints, and warm up the muscles that support the spine. Think of it as a fluid movement that moves the spine through its natural range while keeping compressive forces low.
To perform cat-cow, begin on your hands and knees with your wrists under your shoulders and your knees under your hips. Your spine should be in a neutral position, which means neither excessively curved up or down.
For the cow portion, inhale and gently let your belly drop toward the floor, allowing your lower back to arch downward. Your tailbone lifts slightly, your chest opens forward, and your head can gently look up. This is the extension phase that opens the front of the discs and mobilizes the extension range of the spine.
For the cat portion, exhale and draw your belly button toward your spine, rounding the entire back upward like a cat stretching. Your tailbone tucks under, your head drops down, and your spine curves upward. This is the flexion phase that opens the back of the discs and facet joints where most compression occurs.
Move slowly between these two positions, coordinating the movement with your breathing. Inhale for cow, exhale for cat. Perform eight to twelve repetitions and notice where any stiffness is concentrated. Often people will feel the movement is freer in some sections of the spine and more restricted in others. The restricted areas are where the most work needs to happen.
Cat-cow exercise details:
| Element | Guidance |
|---|---|
| Breathing pattern | Inhale for cow position, then exhale for cat position. |
| Pace | Move slowly and with control, taking about four to five seconds in each direction. |
| Repetitions | Perform eight to twelve cycles. |
| Focus | Feel the movement in the lower back, not only the upper back. |
| Common error | Moving mainly through the hips and upper back without enough lumbar movement. |
| Progression | Add slight holds at each end position for two to three seconds. |
The Piriformis and Hip Flexor Release for Indirect Spinal Decompression
This heading might seem out of place in a spinal decompression article, but the muscles of the hip have a profound effect on the lower spine. The piriformis muscle, located deep in the buttock, and the hip flexors, particularly the iliopsoas which attaches directly to the lumbar vertebrae, both directly affect the alignment and load on the lower spine.
When the piriformis is tight, it can irritate the sciatic nerve and contribute to the perception of lower back and leg pain. When the hip flexors are tight, they pull the pelvis forward and increase the lumbar curve, concentrating pressure on the back of the lumbar discs.
Releasing these muscles is genuinely a form of spinal decompression because it addresses the mechanical forces that are contributing to compression.
For the piriformis stretch, lie on your back with both knees bent. Cross one ankle over the opposite knee, forming a figure-four shape. Reach through the gap and hold the back of the uncrossed thigh. Pull the thigh toward your chest. You should feel a deep stretch in the crossed-leg side buttock. Hold for forty-five to sixty seconds per side. Breathe deeply and allow the stretch to deepen gradually without forcing it.
For the hip flexor stretch, begin in a kneeling lunge position with one knee on the floor and the other foot forward. Keep your torso upright. Gently shift your weight forward onto the front leg until you feel a stretch in the front of the hip on the kneeling side. Avoid leaning forward with the torso, which reduces the stretch on the hip flexors. Hold for forty-five to sixty seconds per side.
Hip and piriformis release stretches:
| Stretch | Target Muscle | Position | Duration |
|---|---|---|---|
| Figure-four piriformis stretch | Piriformis and external hip rotators | Supine figure-four | Forty-five to sixty seconds each side |
| Kneeling hip flexor stretch | Iliopsoas and rectus femoris | Half-kneeling lunge | Forty-five to sixty seconds each side |
| Seated piriformis stretch | Piriformis | Seated figure-four | Thirty to forty-five seconds each side |
| Standing hip flexor stretch | Iliopsoas | Lunge with hip forward | Thirty to forty-five seconds each side |
Pelvic Tilts and Lumbar Resets for Pressure Equalization
Pelvic tilts are a foundational exercise in spinal rehabilitation for good reason. They directly address the position of the pelvis, which is the base of the lumbar spine, and help equalize the pressure distribution across the lumbar discs.
Most people who spend time sitting have a tendency toward an anterior pelvic tilt, meaning the front of the pelvis tilts downward and the back tilts upward. This increases the lumbar curve and places more pressure on the posterior disc margins. Posterior pelvic tilts, the movement that flattens the lower back, provide momentary decompression of those posterior disc surfaces.
To perform a supine pelvic tilt, lie on your back with your knees bent and feet flat on the floor. You will likely notice a natural arch under your lower back with a small gap between your back and the floor. Gently tighten your abdominal muscles and press your lower back toward the floor, flattening that arch. Hold for five seconds and then release. Perform this ten to fifteen times.
The key is to make this a small, controlled movement rather than a forced or dramatic one. The goal is to practice the neuromuscular coordination of using the deep abdominal muscles to control pelvic position, not to force the spine into a particular shape.
The standing wall pelvic tilt adds a functional component. Stand with your back against a wall, your heels a few inches from the wall. Notice the arch in your lower back. Gently press your lower back toward the wall by tilting your pelvis. Hold for five seconds and release. This trains the same movement in a more functional upright position.
Pelvic tilt exercise variations:
| Variation | Position | Purpose | Repetitions |
|---|---|---|---|
| Supine posterior pelvic tilt | Lying on back with knees bent | Flattens the lumbar arch and trains deep core activation. | Ten to fifteen |
| Standing wall pelvic tilt | Standing against a wall | Trains pelvic control in an upright posture. | Ten to fifteen |
| Seated pelvic tilt | Seated on a chair | Provides functional training for desk workers. | Ten to fifteen |
| Combined pelvic tilt and knee slide | Supine position | Adds leg movement to challenge core control. | Eight to ten each side |
Doorway or Wall Supported Lumbar Traction Stretch
This exercise is less well known than the others in this article but is highly effective for people who cannot easily get onto the floor or who do not have access to a hanging bar. It uses the resistance of a wall or doorway to create gentle traction through the lower spine while standing.
To perform the doorway traction stretch, stand in a doorway and grip both sides of the door frame at around hip to waist height. Your elbows will be slightly bent. Walk your feet forward slightly so that your body weight shifts slightly back, as if you are leaning away from the door frame while holding on. Allow your knees to gently bend and your hips to sink downward. Your lower body weight creates traction on the lower spine while your arms hold onto the door frame.
You can increase the decompressive effect by gently swaying side to side in this position, which mobilizes the facet joints while maintaining traction.
An alternative version uses the leg of a sturdy table. Stand beside the table and hold onto the leg with both hands. Walk your feet away from the table slightly and let your body weight create a gentle sideways lean while your hands hold onto the table leg. This side-traction stretch targets the lateral aspects of the lumbar discs and the quadratus lumborum muscle, which is a frequent source of lower back pain.
Supported traction stretch tips:
Hold for thirty to sixty seconds in each position. Breathe slowly and deeply, allowing the body to relax into the traction. Avoid holding the breath, which increases spinal tension. Progress to slightly more body weight over time as tolerance improves. For the doorway version, ensure the door frame is secure and sturdy before applying body weight.
The Foam Roller Thoracic and Lumbar Mobilization
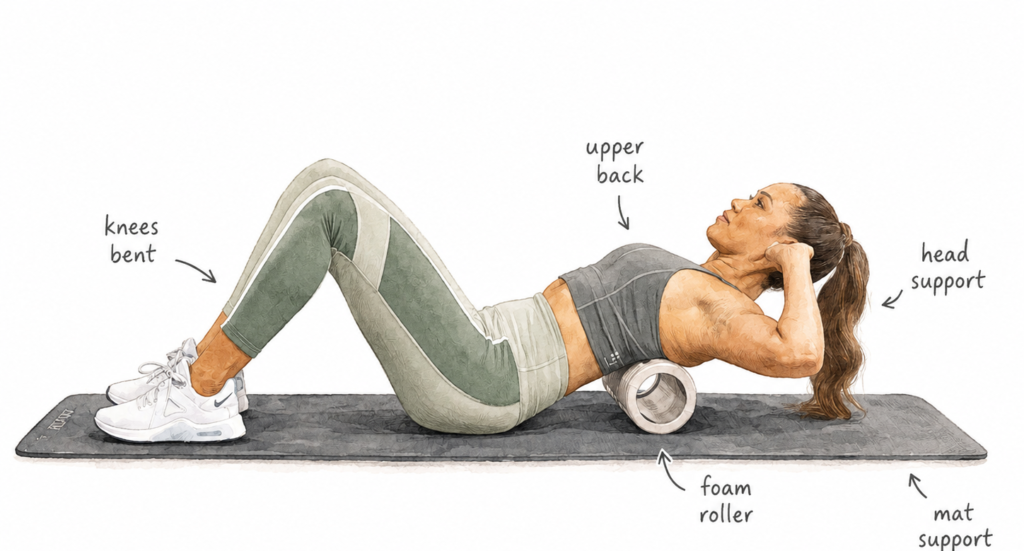
A foam roller offers a simple, accessible tool for spinal decompression work at home. While many people use foam rollers for muscle tissue release, placing the roller under the spine itself creates supported extension that decompresses the posterior joints and stretches the anterior spinal structures.
For a general lumbar mobilization, place the foam roller horizontally on the floor. Sit in front of it and slowly lie back so that the roller is positioned under your mid to lower back. Support your head with your hands. Allow your body weight to press gently into the roller. Breathe slowly and let the muscles around the spine relax into this position. Hold for thirty to sixty seconds and then shift the roller slightly to position it under a different section of the lower back.
The gentle curve of the back over the roller creates a mild extension that opens the front of the disc spaces, which is beneficial for people whose pain is primarily due to flexion-based disc herniation. This is one of the reasons why this position often feels very relieving immediately.
Do not roll vigorously up and down the spine on the roller. The benefit comes from the held position rather than from rolling. Rolling can be used to work through the surrounding muscles before settling into the held decompression positions.
For the lateral lumbar release, roll slightly to one side so that the roller is positioned under the outer edge of one side of the lower back. This targets the quadratus lumborum and lateral facet joints on that side. Hold for thirty to forty-five seconds and then shift to the other side.
Foam roller positions for spinal decompression:
| Position | Target Area | Duration |
|---|---|---|
| Roller under mid-low back, centered | General lumbar extension decompression | Thirty to sixty seconds per segment |
| Roller shifted to one side | Quadratus lumborum and lateral facets | Thirty to forty-five seconds per side |
| Roller under thoracolumbar junction | Junction between the thoracic and lumbar spine | Thirty to sixty seconds |
| Arms overhead while on roller | Increases the extension effect | Twenty to thirty seconds |
Building a Daily Home Decompression Routine
Individual exercises are valuable, but combining them into a structured daily routine that takes fifteen to twenty minutes provides the greatest cumulative benefit. Consistency is the most important factor in results. Doing these exercises daily, even on days when pain is relatively low, creates ongoing spinal health benefits rather than only addressing acute pain episodes.
A practical morning routine might start with five minutes of cat-cow movement to warm the spine and pump fluid into the discs after the overnight period of relative immobility. This is followed by double knee-to-chest stretches held for sixty seconds twice. Then the piriformis figure-four stretch on each side for forty-five seconds each. Then child’s pose held for ninety seconds twice. Finally, ten pelvic tilts to activate the deep core and reset pelvic position before standing.
An evening routine might focus more on releasing the compression that has accumulated throughout the day from sitting, standing, and activity. Start with the foam roller under the lower back for three to four positions, thirty to sixty seconds each. Then the hip flexor kneeling stretch on each side. Then supine spinal twist on each side. Finish with a final child’s pose to lengthen the spine before bed.
For people who can access a hanging bar, two to three sets of hanging for twenty to forty-five seconds each can be incorporated at any time of day, ideally once in the morning and once in the evening.
Sample morning decompression routine:
Spinal Decompression Exercise Routine
| Exercise | Duration | Repetitions |
|---|---|---|
| Cat-cow movement | Four to five seconds each direction | Eight to twelve cycles |
| Double knee-to-chest | Sixty seconds hold | Two repetitions |
| Piriformis figure-four stretch | Forty-five seconds each side | One repetition each side |
| Child’s pose | Ninety seconds hold | Two repetitions |
| Supine pelvic tilts | Five second holds | Ten to fifteen repetitions |
Sample evening decompression routine:
| Exercise | Duration | Repetitions |
|---|---|---|
| Foam roller lower back positions | Thirty to sixty seconds each position | Three to four positions |
| Kneeling hip flexor stretch | Forty-five to sixty seconds each side | One to two repetitions each side |
| Supine spinal twist | Forty-five to sixty seconds each side | One to two repetitions each side |
| Child’s pose | Ninety seconds | Two repetitions |
| Hanging, if available | Twenty to forty-five seconds | Two to three repetitions |
How Long Before Results Are Noticeable
One of the most common questions about home spinal decompression exercises is how long it takes to see improvement. The honest answer is that it varies considerably depending on the severity of the compression, how long the problem has existed, and how consistently the exercises are performed.
For people with mild to moderate lower back stiffness or discomfort from prolonged sitting and poor posture, noticeable relief can occur within two to four days of consistent practice. This is because much of the discomfort comes from tight muscles and facet joint restriction rather than significant disc damage, and these respond quickly to movement and decompression.
For people with disc herniations, chronic disc degeneration, or longer-standing pain, measurable improvement typically takes two to six weeks of consistent daily practice. Research on spinal traction and decompression generally shows clinically significant improvements in pain and function over a four to eight week period when treatment is consistent.
The exercises need to be performed daily, or at minimum five times per week, to produce meaningful results. Doing the routine once or twice a week is unlikely to create the cumulative mechanical and hydration benefits that consistent daily practice provides.
Progress expectations for home spinal decompression exercises:
| Condition | Expected Timeline for Improvement |
|---|---|
| Postural lower back stiffness | Two to seven days of consistent practice. |
| Mild disc-related pain | One to three weeks of consistent practice. |
| Moderate disc herniation or sciatica | Four to eight weeks of consistent practice. |
| Chronic disc degeneration | Ongoing maintenance with gradual improvement over months. |
| Post-operative recovery | Follow specific medical guidance, and add decompression exercises only when cleared. |
Lifestyle Changes That Support Spinal Decompression Work
The exercises are most effective when they are supported by adjustments to daily habits that reduce compression during the rest of the day. Exercises that take twenty minutes in the morning can be significantly undermined by eight hours of compressive sitting at a desk in poor posture.
Setting a timer to stand up and move for two to three minutes every thirty to forty-five minutes during prolonged sitting is one of the most evidence-supported habits for spinal health. Research has consistently shown that regular movement breaks during desk work reduce cumulative spinal loading and improve disc hydration.
Improving sitting posture reduces the uneven loading that concentrates pressure at specific disc levels. Sitting with the hips slightly higher than the knees, the lower back supported, and the screen at eye level distributes spinal load more evenly.
Drinking adequate water throughout the day supports disc hydration. The nucleus pulposus, the gel-like center of the intervertebral disc, is approximately seventy to ninety percent water. Disc hydration depends on both mechanical loading cycles and general systemic hydration. Aim for around two liters of water per day as a general guide.
Sleeping on a mattress that supports the natural curves of the spine matters for overnight spinal decompression. The night is actually a significant spinal decompression period when the body is horizontal and gravitational compression is minimal. Sleeping on a mattress that is too soft allows the spine to sag, while one that is too firm does not accommodate natural spinal curves. A medium-firm mattress is generally recommended in sleep research for lower back health.
Lifestyle habits that support spinal decompression:
| Habit | Why It Helps |
|---|---|
| Movement break every thirty to forty-five minutes | Prevents prolonged sustained compression on the spinal discs. |
| Improved sitting posture | Distributes load more evenly across the discs. |
| Adequate daily water intake | Supports disc hydration and overall tissue health. |
| Medium-firm mattress | Supports natural spinal curves during overnight decompression. |
| Avoiding prolonged static positions | Helps prevent fluid loss from discs under sustained load. |
| Regular walking | Provides gentle loading and unloading that may help pump fluid through the discs. |
When to Combine Home Exercises With Professional Treatment
Home decompression exercises are a powerful tool, but they work best as part of a broader approach to spinal health. For many people, combining home exercises with professional guidance from a physical therapist, chiropractor, or osteopath produces faster and more complete results.
A physical therapist can assess the specific pattern of your lower back pain, identify which movements and positions are most beneficial for your particular condition, and create a tailored exercise program that addresses your individual weaknesses, restrictions, and pain patterns.
Chiropractic or osteopathic manipulation can address specific joint restrictions in the lumbar spine that exercises alone may not fully resolve. When a facet joint is stuck or restricted, a targeted manipulation can restore movement to that joint immediately in a way that gradual exercise cannot always replicate.
Professional mechanical traction, available in clinical settings, provides a more controlled and measured decompression force than most home exercises can achieve. For severe disc herniations or cases where home exercises are not producing adequate results, clinical traction may be worth considering as an adjunct to home practice.
The key message is that home exercises and professional treatment are not mutually exclusive. Using them together, with the home exercises maintaining and extending the benefits achieved in professional sessions, is the most effective overall strategy.
Situations where professional support adds significant value:
| Situation | Recommended Professional Support |
|---|---|
| Severe or progressively worsening leg pain | Physical therapist or spine physician assessment. |
| No improvement after four to six weeks of home exercises | Physical therapy or chiropractic evaluation. |
| Specific diagnosis such as disc herniation or stenosis | Tailored professional rehabilitation program. |
| Post-surgical recovery | Structured medical rehabilitation. |
| Uncertainty about which exercises are appropriate | Physical therapist assessment and guidance. |
Final Thoughts on Lower Spinal Decompression at Home
The lower spine is one of the hardest-working structures in the body. It carries load, allows movement, protects the spinal cord, and yet is expected to function perfectly despite hours of sitting, poor posture, stress, and the general demands of modern life. Compression is an inevitable consequence of these demands, but it does not have to lead to chronic pain or disability.
Home decompression exercises are one of the most practical, cost-effective, and well-evidenced approaches to managing lower back compression and the pain, stiffness, and nerve symptoms that come with it. They require no equipment beyond a mat, and in the case of most exercises, not even that. They can be done first thing in the morning, in the evening, or broken up throughout the day.
The exercises described in this article, from child’s pose and knee-to-chest stretches to hanging, cat-cow movement, piriformis releases, pelvic tilts, foam roller work, and supported traction stretches, together address the full spectrum of compressive forces that act on the lower spine. Each exercise has a specific mechanism and specific benefits, and together they form a comprehensive daily program that most people can follow without supervision.
The most important thing is consistency. A routine performed daily over weeks and months produces cumulative structural benefits that periodic or occasional exercise simply cannot match. Combined with sensible lifestyle habits around sitting, hydration, sleep, and movement, a daily home decompression practice represents a genuinely powerful approach to keeping the lower spine healthy, mobile, and free from the kind of chronic compression that leads to pain and reduced quality of life.