
How Long Does Getting Braces Off Really Take
The day you get your braces removed is one of the most anticipated moments of orthodontic treatment. After months or even years of adjustments, dietary restrictions, special cleaning routines, and the general discomfort of having metal brackets and wires on your teeth, the removal appointment feels like a major milestone. But one question that surprises many patients is how long the actual removal process takes.
Most people going into a debonding appointment, which is the clinical term for having braces removed, have no clear expectation of how long it will take. Some assume it will be quick, like removing a piece of tape. Others worry it will be painful and drawn out. The reality sits somewhere in between, and it varies depending on several factors including the type of braces, the number of teeth involved, the adhesive used, and what else needs to happen at the same appointment.
What the Term Debonding Actually Means
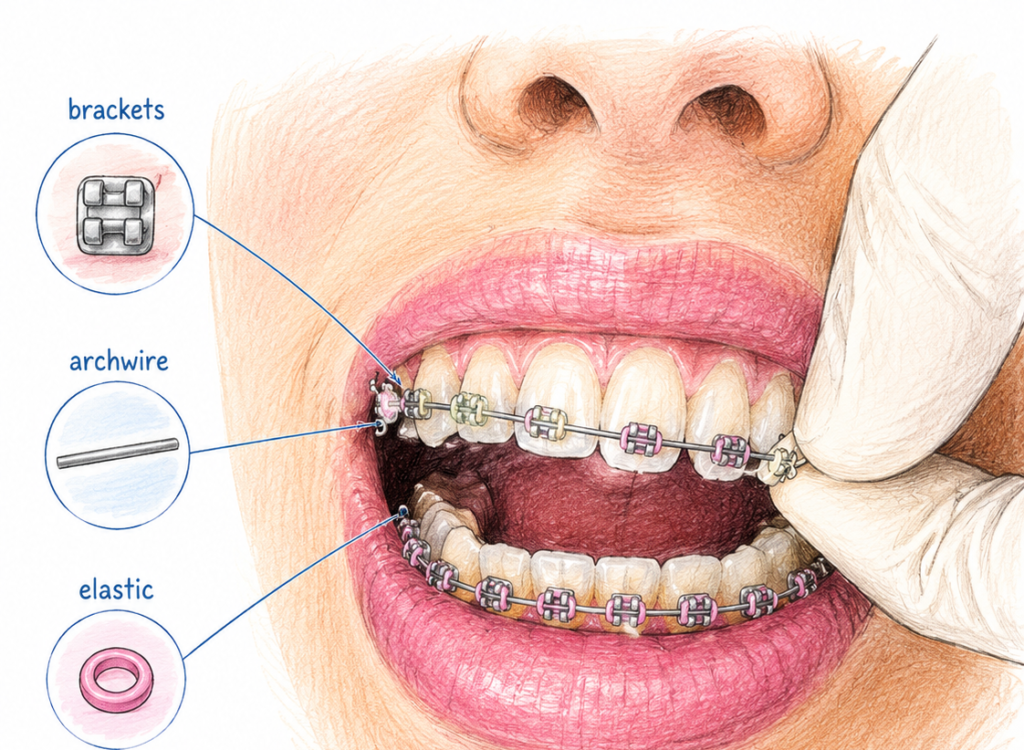
When orthodontists talk about removing braces, they use the word debonding. This refers specifically to the process of separating the brackets and bands from the tooth surfaces and removing the adhesive that held them in place.
Each bracket that was placed on your teeth at the start of treatment was bonded to the tooth surface using a dental adhesive, which is a type of composite resin similar to the material used in tooth-colored fillings. This adhesive creates a very strong bond between the bracket base and the enamel. When treatment is complete, this bond needs to be safely broken and all of the adhesive removed without damaging the enamel underneath.
The process requires careful, controlled force applied with specific instruments. It is not simply a matter of pulling brackets off. Done carelessly or with the wrong tools, bracket removal can chip or crack enamel, which is one of the most common complications of orthodontic treatment when debonding is performed without proper technique.
The debonding appointment is therefore not a single quick action. It is a multi-step clinical procedure that has several distinct phases, each of which takes a specific amount of time.
Phases of a braces removal appointment:
Braces Removal Process Step by Step
| Phase | What Happens |
|---|---|
| Bracket removal | Brackets are squeezed to break the adhesive bond. |
| Band removal | Molar bands are removed with band-removing pliers. |
| Adhesive removal | Residual composite resin is polished off the enamel. |
| Cleaning and polishing | Staining, plaque, and composite residue are removed. |
| Impressions or digital scans | Molds or scans are created for retainers. |
| Retainer fitting, if ready | Fixed or removable retainers are fitted. |
| Final examination | Bite, alignment, and tooth health are checked. |
| Instructions and education | Retainer wear, cleaning, and follow-up guidance are explained. |
How Long the Entire Appointment Actually Takes
The total time for a braces removal appointment typically ranges from forty-five minutes to two hours. The variation in this range depends on several factors that will be discussed throughout this article. For a patient with a standard case who is receiving removable retainers that were pre-made in advance, the appointment might take around sixty to ninety minutes. For a patient who needs fixed retainers bonded on the same day, whose teeth have significant adhesive buildup, or whose case was more complex, the appointment can extend to two hours or slightly beyond.
Breaking this down into each step, bracket removal for a full set of upper and lower braces typically takes ten to twenty minutes. Adhesive removal and cleaning takes another fifteen to thirty minutes depending on how much residue there is. Taking impressions or digital scans for retainers takes ten to fifteen minutes. Fitting retainers, if they are ready, takes another ten to fifteen minutes. The final examination and consultation with the orthodontist takes five to fifteen minutes. Patient instructions and review take an additional five to ten minutes.
These times are estimates, and a skilled, experienced dental team can perform each step efficiently. However, rushing any part of the process, particularly adhesive removal, increases the risk of enamel damage or incomplete cleaning, so good orthodontists take the time needed rather than rushing.
Estimated time breakdown for braces removal appointment:
| Step | Estimated Time |
|---|---|
| Bracket removal | Ten to twenty minutes |
| Band removal, molars | Five to ten minutes |
| Adhesive polishing and cleanup | Fifteen to thirty minutes |
| Cleaning, polishing, and stain removal | Ten to fifteen minutes |
| Impressions or digital scanning | Ten to fifteen minutes |
| Retainer fitting, if ready same day | Ten to fifteen minutes |
| Orthodontist examination | Five to fifteen minutes |
| Instructions and retainer education | Five to ten minutes |
| Total range | Forty-five minutes to two hours |
What Happens During Bracket Removal: Step by Step
For most patients, the bracket removal phase is the most nerve-wracking part of the appointment because they have heard stories about it being painful or about teeth being damaged. Understanding exactly what happens during this phase can reduce anxiety and help patients know what to expect.
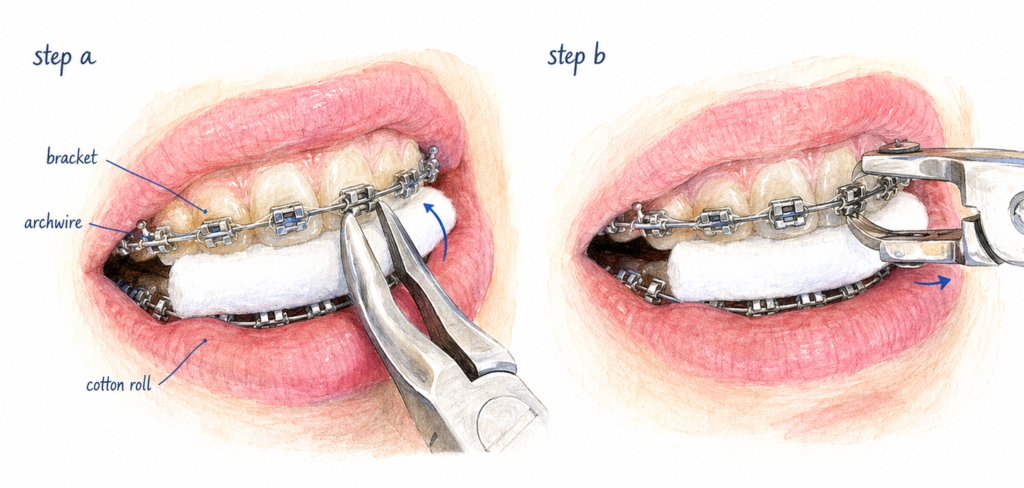
The orthodontist or orthodontic technician uses a special instrument called debonding pliers, or bracket-removing pliers, to remove each bracket. These pliers are designed to place controlled force on the base of the bracket in a way that deforms or crushes the bracket slightly, which breaks the bond between the bracket base and the adhesive layer without pulling on the tooth itself. The force is directed horizontally rather than vertically, which means it does not try to peel the bracket directly off the tooth surface but rather cracks it free at the adhesive interface.
When a bracket releases, patients typically hear a small click or cracking sound. This can be alarming if you are not expecting it, but the sound is the adhesive bond breaking, not anything happening to the tooth. Most patients describe the sensation as a brief feeling of pressure rather than pain. Some patients report a slight soreness that lasts during the process and for a short time afterward, but outright pain during debonding is not the norm with modern techniques.
The brackets are removed one by one. A standard full set of braces involves approximately twenty brackets for most patients, covering the upper and lower arches from the first molar on one side to the first molar on the other. Some patients have brackets on second molars as well, which adds to the total.
After the brackets are removed, the molar bands need to be addressed. Molar bands are the rings of metal that go all the way around the molar teeth and are bonded with a different type of cement than the brackets. They require a slightly different instrument and technique to remove. Band-removing pliers work by placing force at the gumline side of the band to push it upward and off the tooth. This can sometimes cause a brief, sharp pressure sensation, particularly on the upper molars.
Bracket and band removal details:
| Element | Instrument Used | Sensation | Time per Tooth |
|---|---|---|---|
| Bracket | Debonding pliers | Brief pressure and a clicking sound | Thirty to sixty seconds |
| Molar band | Band-removing pliers | Brief sharp pressure | One to two minutes per band |
| Archwire removal | Done before brackets | No sensation | One to two minutes per arch |
| Elastic ligatures or modules | Removed with a scaler or similar tool | None or minimal sensation | Quick, done first |
Why Adhesive Removal Takes the Most Time
After the brackets and bands are removed, the teeth have small raised islands of composite adhesive remaining on their surfaces. This material is what the brackets were bonded to, and it does not come off when the brackets are removed. Removing this adhesive thoroughly and safely is the most time-consuming and technically important part of the debonding appointment.
The adhesive is removed using a combination of instruments. Rotary handpieces, which are the dental drills used for fillings, are fitted with fine burs or polishing instruments to carefully grind away the adhesive without removing enamel. Tungsten carbide burs are commonly used because they cut the composite resin efficiently without aggressively cutting enamel. Some practices use ultrasonic scalers for part of the adhesive removal. The final stage typically involves polishing with rubber cups and a fine polishing paste to smooth the tooth surface completely.
The skill required for this step is significant. The adhesive has a similar hardness and light-transmitting quality to natural enamel, which makes it difficult to see clearly at the boundary between the two. Removing too little leaves a rough surface and visible adhesive remnant. Removing too much can gouge or thin the enamel, which is permanent damage that cannot be repaired. Experienced orthodontists and dental assistants who perform many debonding procedures develop the tactile and visual sensitivity to clean the enamel accurately.
On average, adhesive removal takes about one to two minutes per tooth when performed carefully. For twenty or more teeth, this adds up to thirty to forty minutes in a typical case. Patients who had heavy, thick adhesive applied or who had their brackets in place for many years may have more adhesive to remove, which adds time.
Factors that affect adhesive removal time:
| Factor | How It Affects Time |
|---|---|
| Amount of adhesive used during bonding | More adhesive means more material needs to be removed. |
| Duration of treatment | Longer treatment may leave more staining or harder adhesive. |
| Bracket type | Ceramic brackets may leave different adhesive patterns than metal brackets. |
| Tooth surface condition | Very curved or irregular tooth surfaces can take longer to clean. |
| Skill of the operator | Experienced technicians can work more efficiently and safely. |
How Ceramic Braces Affect Removal Time and Difficulty
Ceramic braces are made from a clear or tooth-colored material rather than metal, and they are popular because they are less visible. However, ceramic brackets behave differently from metal brackets during removal, and this is something that patients with ceramic braces should understand before their debonding appointment.
Ceramic brackets do not deform the way metal brackets do when debonding pliers are applied. Metal brackets crush slightly at the base when force is applied, which is what breaks the bond cleanly. Ceramic is much more brittle. Instead of deforming, ceramic brackets tend to fracture under the same applied force. This means they often break apart during removal rather than releasing cleanly as a single piece. The fragments then need to be individually removed, which adds time to the procedure.
The adhesive used with ceramic brackets also tends to bond more tenaciously to the enamel because of the nature of the bracket base material. Some ceramic brackets have a chemical bond with the adhesive rather than just a mechanical one. This means the adhesive removal phase after ceramic bracket debonding is often more involved than after metal bracket removal.
Patients with ceramic braces should expect their removal appointment to take somewhat longer than a comparable metal bracket case. Some orthodontists estimate that ceramic bracket debonding takes approximately twenty to thirty percent longer than metal bracket removal for an equivalent case.
Some ceramic bracket designs have been developed specifically to make removal easier. These brackets have a modified base design or are made from a toughened ceramic that fractures in a more controlled way during debonding. The use of these bracket types has reduced, but not eliminated, the additional time required for ceramic debonding.
Metal versus ceramic braces removal comparison:
| Aspect | Metal Brackets | Ceramic Brackets |
|---|---|---|
| Removal mechanism | Deformation and release | Fracture and fragment removal |
| Risk of bracket breaking | Low | Higher |
| Adhesive bonding type | Primarily mechanical | Mechanical and sometimes chemical |
| Total removal time | Baseline | Twenty to thirty percent longer |
| Enamel risk | Low with correct technique | Slightly higher due to harder adhesive |
| Post-removal polishing time | Standard | Often more extensive |
What Patients Actually Feel During the Process
One of the most common concerns people have about getting their braces off is the pain level. The honest answer is that most people find the process uncomfortable rather than painful, and the discomfort is usually brief and manageable.
During bracket removal, the most common sensation is pressure. The debonding pliers press against the bracket and tooth, and even though the force is not directed at the tooth itself, the bone and periodontal ligament that supports the tooth transmit the pressure. Patients who had particularly long treatment, or whose teeth are more sensitive due to gum recession, may find this phase more uncomfortable than those with healthier, more robust supporting structures.
The click or pop sound when a bracket releases can cause a startle response, and some patients find it more distressing psychologically than physically. Knowing in advance that this will happen can help.
The adhesive removal phase involves the dental drill running over the tooth surface. For patients with no cavities and intact enamel, this does not cause pain because the drill is working on the adhesive rather than the tooth itself. However, if the drill gets close to the enamel at any point, patients may feel sensitivity, particularly to the heat generated by the friction. Water cooling from the drill reduces this heat, but some sensitivity is possible. Patients who already have sensitive teeth may notice more discomfort during this phase.
The polishing phase at the end is typically the most comfortable part of the whole appointment. The rubber cup and polishing paste create a mild vibration and a slightly gritty sensation, but most patients find it pleasant compared to the earlier stages.
After the appointment, teeth may feel slightly tender for one to two days. The teeth have been under sustained mechanical force for months or years, and the final manipulation of removal can leave the periodontal ligament temporarily sensitized. This settles on its own without treatment in most cases.
Pain and sensation management during removal:
| Stage | Typical Sensation | Duration | Management |
|---|---|---|---|
| Bracket removal | Pressure with occasional brief sharpness | Ten to twenty minutes total | Breathe calmly. Local anesthetic is rarely needed. |
| Band removal | Brief sharp pressure | One to two minutes per band | Over-the-counter pain relief before the appointment may help if you are anxious. |
| Adhesive removal | Vibration with possible heat sensitivity | Twenty to thirty minutes | Water cooling from the handpiece helps reduce heat. |
| Polishing | Mild vibration and a gritty feeling | Ten to fifteen minutes | Generally comfortable for most patients. |
| Post-appointment | Mild tooth tenderness | One to two days | Over-the-counter ibuprofen or acetaminophen may help if suitable. |
Why the Day Retainers Are Ready Changes Everything
One detail that significantly affects both the length and the flow of a debonding appointment is whether the retainers are ready and waiting at the appointment or need to be made afterward.
There are two general approaches to retainer timing. In the first approach, the orthodontist takes impressions or digital scans at a separate appointment a week or two before the braces come off. The retainers are fabricated in advance by a dental laboratory, and when the braces come off, the retainers are ready to be fitted at the same appointment. This is the most efficient approach because everything is done in one visit.
In the second approach, impressions or scans are taken at the debonding appointment itself, immediately after the braces are removed. The retainers are then sent to a laboratory and the patient returns a week or two later to receive them. In the meantime, the patient is without retainers, which carries some risk of minor tooth movement, particularly in the first weeks after braces are removed when the teeth are most likely to shift.
The timing of the appointment varies by practice. Some orthodontists prefer to take final records before removal to confirm that treatment goals have been met and to have the retainers ready on debonding day. Others take the impressions on the day because they want to capture the exact tooth positions immediately after treatment ends.
When retainers are not ready on debonding day, the appointment is shorter, typically sixty to ninety minutes rather than ninety minutes to two hours, but requires a follow-up appointment to receive the retainers.
Retainer timing and its effect on appointment length:
| Scenario | Appointment Length | Follow-Up Needed |
|---|---|---|
| Retainers pre-made and fitted same day | Ninety minutes to two hours | Typically a routine check six to twelve weeks later |
| Impressions taken at debonding, retainers later | Sixty to ninety minutes | Follow-up in one to two weeks for retainer fitting |
| Fixed retainer bonded same day | Add fifteen to thirty minutes | Routine follow-up |
| Combination fixed and removable retainers | Add thirty to forty-five minutes | Follow-up to check fit and compliance |
Types of Retainers and How Long Each Takes to Fit
Understanding the types of retainers and how they are fitted helps clarify why the total appointment time varies so much between patients.
Removable retainers come in two main styles. The Hawley retainer is the traditional type, made from acrylic and wire, and it was the standard for decades. The Essix retainer is the clear plastic aligner-style retainer that looks similar to an Invisalign tray. Both are made from impressions or scans taken of the teeth. Fitting a removable retainer takes about five to ten minutes. The orthodontist checks that it fits correctly, makes any adjustments needed, and instructs the patient on wear and care.
Fixed retainers, also called bonded retainers or lingual retainers, are thin wires bonded to the back surface of the teeth, typically the lower front six teeth and sometimes the upper front teeth. They are designed to stay in place permanently and provide continuous retention without relying on patient compliance. The bonding process involves cleaning and etching the tooth surfaces, applying composite adhesive, and carefully positioning the wire so that it does not interfere with the bite. Bonding a fixed retainer takes between fifteen and thirty minutes depending on the arch and the complexity of the wire placement.
Some patients receive both a fixed retainer and a removable retainer, which adds the total fitting time for both. This is increasingly common because the combination provides both reliable continuous retention from the fixed wire and the ability to clean the teeth fully with the removable retainer out.
Retainer types and their fitting time:
| Retainer Type | Description | Fitting Time | Notes |
|---|---|---|---|
| Hawley retainer | Acrylic and wire, removable | Five to ten minutes | May need minor adjustments |
| Essix clear retainer | Clear plastic tray, removable | Five to ten minutes | Very discreet, but wears over time |
| Fixed bonded retainer | Wire bonded to the back of teeth | Fifteen to thirty minutes | Permanent and does not rely on patient compliance |
| Combination retainer | Fixed lower retainer plus removable upper retainer | Twenty to forty minutes | Most comprehensive retention approach |
What Happens to Teeth Right After Braces Come Off
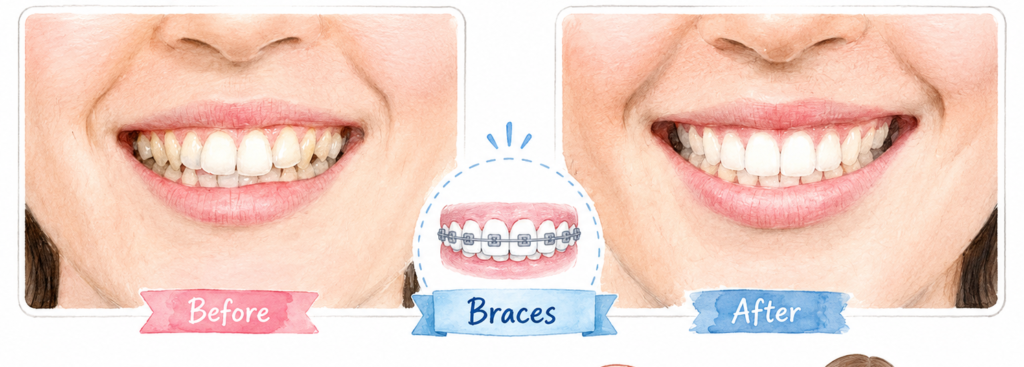
Most patients are surprised by how their teeth look and feel immediately after the braces come off. Some changes are positive and expected. Others require further treatment or attention.
The first thing most patients notice is that the teeth feel incredibly smooth and slippery compared to how they felt with brackets on. This sensation, of running your tongue over clean, smooth tooth surfaces, is one of the most satisfying moments after years of having metal in your mouth.
Many patients also notice white spots on their teeth. These are called white spot lesions and they are areas of demineralization, meaning the mineral content of the enamel has been lost in those spots due to acid exposure from plaque that accumulated around the brackets. White spots appear white or chalky and are more visible once the brackets are removed because the brackets were covering the area directly around them.
White spots that have formed during orthodontic treatment are one of the most common and frustrating outcomes of braces. Research published in the American Journal of Orthodontics and Dentofacial Orthopedics has shown that the prevalence of white spot lesions in patients who have completed fixed appliance treatment ranges from approximately twenty-five to seventy-five percent, with the wide range reflecting differences in patient oral hygiene and the duration of treatment.
Some white spots fade significantly over the months following treatment as the enamel naturally remineralizes. Fluoride toothpaste and fluoride varnish applications can accelerate this remineralization. For white spots that do not improve on their own, treatments including professional fluoride treatment, topical remineralizing agents, and in more severe cases, microabrasion or resin infiltration, can improve their appearance.
Teeth may also look slightly yellower than expected immediately after removal. This happens for several reasons. The enamel may have accumulated staining from food and drinks in the areas around the brackets that was difficult to clean fully. The brackets themselves protected the enamel directly under them from staining, creating a slight contrast between the under-bracket area and the surrounding enamel. Professional polishing at the end of the removal appointment addresses much of this, but some staining may require professional whitening after the teeth have had time to settle.
Common post-braces tooth changes:
| Change | Cause | Timeline for Resolution | Treatment If Needed |
|---|---|---|---|
| Smooth tooth surface sensation | Normal feeling after brackets are removed | Immediate and permanent | None |
| White spot lesions | Demineralization under plaque around brackets | May improve over months, but some spots can be permanent | Fluoride, remineralizing agents, or resin infiltration |
| Staining around bracket areas | Difficult-to-clean areas during treatment | Usually improves within weeks with proper care | Professional whitening if needed |
| Slight tooth sensitivity | Minor enamel disturbance during adhesive removal | One to two days | Sensitive toothpaste and time |
| Teeth looking slightly uneven | Slight residual adhesive or enamel variation | Usually resolves with polishing | Final polish at the appointment |
Whitening Teeth After Braces: When and How Long to Wait
One of the most common questions patients ask at their braces removal appointment is about teeth whitening. After years of having braces, many people want the brightest possible smile to show off their new alignment. The desire is completely understandable, but the timing of whitening matters.
Orthodontists generally recommend waiting at least four to eight weeks after braces are removed before beginning whitening treatment. There are several reasons for this.
First, the teeth are slightly dehydrated from the polishing and cleaning procedures performed at the removal appointment. Dehydrated enamel is more porous and more sensitive to the bleaching agents in whitening products. Whitening immediately after removal can cause significant, sometimes severe sensitivity.
Second, the enamel surface has been mildly disturbed during the adhesive removal process. Even when done carefully, the micro-surface of the enamel benefits from a recovery period during which remineralization can restore the surface structure.
Third, any white spot lesions present on the teeth will look more pronounced immediately after whitening because the demineralized areas respond to bleaching agents differently than intact enamel. Waiting for the white spots to remineralize before whitening gives a more even result.
During the waiting period, using a toothpaste that contains fluoride and a remineralizing agent such as hydroxyapatite can help prepare the enamel for better whitening results.
When it is time to whiten, professional in-office whitening under orthodontic or dental supervision gives the most controlled and effective results. Home whitening trays made from impressions of the post-braces teeth are also very effective and allow patients to control the level of whitening they achieve.
Whitening timeline after braces:
| Timing | Recommendation | Reason |
|---|---|---|
| Immediately after removal | Avoid whitening | Enamel may be dehydrated or disturbed, increasing sensitivity risk. |
| First four to eight weeks | Use fluoride toothpaste and remineralizing products | Allows enamel recovery and helps white spot remineralization. |
| After four to eight weeks | Begin whitening if white spots have improved | Helps create more even whitening results. |
| Ongoing | Maintain with whitening toothpaste or occasional touch-up | Helps preserve whitening results over time. |
What the First Few Days Feel Like After Braces Come Off
The first few days after braces are removed are an adjustment period, both physically and psychologically. Understanding what to expect during this time helps patients navigate the transition smoothly.
Physically, teeth may feel slightly sore or tender for one to two days. This is from the final mechanical manipulation of the removal process and from the polishing and cleaning. Taking over-the-counter pain relief like ibuprofen or acetaminophen as needed during this period is entirely appropriate.
Teeth may feel unusually sensitive to temperature for a few days. Cold water, cold food, or cold air may cause brief, sharp sensitivity that was not present before. This typically settles within a few days as the enamel adjusts and the mild disturbance from adhesive removal resolves.
The bite may feel slightly different. After years of having brackets and wires adding thickness to the teeth, the mouth has adjusted to this feeling. When the brackets are removed, the teeth feel much thinner and the bite contact points change. Most patients adapt to this new feeling within days, but some patients notice that their bite feels slightly off initially. This is usually not a real occlusal problem but rather a sensory adjustment. If the bite still feels wrong after a week, mentioning it at the follow-up appointment is worthwhile.
Psychologically, many patients feel a strange mix of joy and discomfort. The teeth look and feel very different without braces, and the new appearance takes some getting used to even when the result is exactly what everyone hoped for.
First week after braces removal experience:
Wearing Retainers and Why This Stage Matters More Than People Realize
The removal of braces is not the end of orthodontic treatment. It is the beginning of the retention phase, which lasts for life in the case of fixed retainers or for many years in the case of removable retainers.
The teeth want to move back toward their original positions after braces are removed. This is not a failure of the orthodontic treatment. It is a biological reality called relapse, and it is driven by the elastic fibers in the periodontal ligament, the gum tissue, and the natural forces of biting and speaking. These forces have been at work throughout treatment, pushing against the movement the braces were creating, and once the braces are removed, those forces are still present.
Research consistently shows that retention is essential for long-term treatment stability. A study published in the Angle Orthodontist found that without retention, significant tooth movement occurs within the first year after braces are removed in the majority of patients. The greatest rate of movement happens in the first three to four months after debonding.
For removable retainers, orthodontists typically recommend wearing them full-time, meaning all day and all night, for the first three to six months after braces are removed. This full-time wear period is the most critical because it is when the supporting structures of the teeth are most susceptible to relapse. After this period, many orthodontists transition patients to night-only wear, which is then maintained indefinitely.
Skipping retainer wear, even for a few days during the initial full-time period, can allow noticeable tooth movement to occur. A retainer that fit perfectly one week may feel tight or difficult to fully seat the following week if it was not worn consistently. When a retainer no longer fits, it cannot apply the gentle force needed to hold the teeth in position, and it may need to be replaced.
Retainer wear schedule after braces:
Retainer Wear Schedule After Braces
| Time Period | Recommended Wear | Reason |
|---|---|---|
| First three to six months | Full time, twenty to twenty-two hours per day | This is the period with the highest risk of teeth shifting back. |
| Months six to twelve | Usually nights only | Most early movement risk has passed, but teeth still need support. |
| After year one | Nights only, ongoing | Helps maintain long-term tooth alignment. |
| If a retainer is lost or broken | Replace it immediately and call your orthodontist | Teeth can shift significantly without a retainer. |
How Long Until You Can Eat Normally After Removal
One of the immediate pleasures of having braces removed is the ability to eat foods that were off-limits during treatment. Hard foods like apples, carrots, and nuts that could break brackets, and sticky foods like caramel and chewing gum that could pull wires, are suddenly back on the menu.
There are very few dietary restrictions after braces are removed. The teeth may be slightly tender for one to two days, which makes hard or crunchy foods uncomfortable during that initial period. Choosing softer foods for the first day or two is practical common sense rather than a clinical requirement.
One dietary consideration that does apply after braces is the need to avoid biting directly into hard foods if you have a fixed retainer on the back of your teeth. The thin bonded wire of a fixed retainer can be dislodged by biting into very hard foods with the front teeth, particularly apples, corn on the cob, or hard crusty bread. The retainer wire itself is sturdy, but the bond between the wire and the tooth surface can be broken by direct impact force. Cutting these foods into pieces rather than biting directly into them is a habit worth developing.
What changes in your diet after braces are removed:
Foods During Braces vs After Braces
| Food Category | During Braces | After Braces |
|---|---|---|
| Hard raw vegetables | Avoid biting directly | Can eat freely, but cut into pieces if a front bonded retainer is present. |
| Sticky candy and gum | Avoid completely | Can eat, but avoid if you have a bonded retainer. |
| Hard candy | Avoid | Can eat, but be mindful of the retainer. |
| Nuts | Avoid | Can eat freely. |
| Corn on the cob | Avoid | Cut off the cob if a bonded retainer is present. |
| Chewy bread and bagels | Limit | Can eat freely. |
Common Questions About the Removal Process Answered
Patients often arrive at their debonding appointment with a list of questions. Here are the most commonly asked ones with clear, practical answers.
Does getting braces off hurt? For most people, the process is more uncomfortable than painful. Pressure during bracket removal and vibration during polishing are the main sensations. Actual sharp pain during the process is uncommon and usually indicates a need to slow down or adjust technique. Post-appointment tenderness for one to two days is normal.
Can teeth be damaged when braces come off? Enamel damage is possible if debonding is performed incorrectly or too aggressively. With proper technique and instruments, the risk is very low. This is one reason why having braces removed by the orthodontist who placed them, rather than attempting any kind of self-removal, is essential.
Why do my teeth look different immediately after removal? The combination of bracket removal, stain from around the brackets, and the polishing process all contribute to the initial appearance. The final appearance of the teeth typically improves significantly over the following weeks with good brushing and polishing.
How soon can I get professional whitening? Waiting four to eight weeks is the general recommendation to allow enamel recovery and white spot remineralization before whitening.
What if my retainer does not fit at first? A removable retainer that feels tight is applying appropriate retention force. A retainer that cannot be fully seated at all, or one that causes sharp pain, should be checked by the orthodontist. Never force a retainer into position if it genuinely does not fit.
What if a tooth feels loose after braces? Teeth may feel very slightly mobile immediately after removal because the periodontal fibers are still adapting. True looseness that persists beyond a few weeks is uncommon and should be assessed.
Common questions and quick answers:
Common Questions About Braces Removal
| Question | Answer |
|---|---|
| How long does the whole appointment take? | Forty-five minutes to two hours, depending on case complexity and retainer timing. |
| Does it hurt? | Mostly pressure and vibration, not sharp pain for most patients. |
| Can teeth be damaged? | Risk is low with proper technique, but much higher with incorrect technique. |
| Why do teeth look different immediately? | Stain contrast, polishing changes, and adhesive residue removal can change the appearance. |
| When can I whiten? | Four to eight weeks after removal is usually best for more even results. |
| How soon do teeth shift without retainers? | Movement can begin within days, and significant relapse is possible within weeks to months without retention. |
Long-Term Care After the Braces Come Off
The removal of braces opens a new chapter in your dental care. The effort and investment put into orthodontic treatment are worth protecting, and the habits you build in the months and years after removal will determine how well your smile holds up over time.
Retainer wear is the single most important long-term habit. The evidence on tooth stability consistently shows that patients who wear retainers as directed maintain their results far better than those who do not. Teeth that relapsed after treatment can be challenging to re-treat, and the financial and time cost of retreatment is significantly more than the ongoing effort of wearing a retainer at night.
Regular dental checkups and cleanings are important for detecting any issues that developed during orthodontic treatment, including white spot progression, gum changes from years of braces, or new areas of decay. The first dental cleaning after braces are removed is particularly thorough because areas that were difficult to clean around brackets can now be fully accessed.
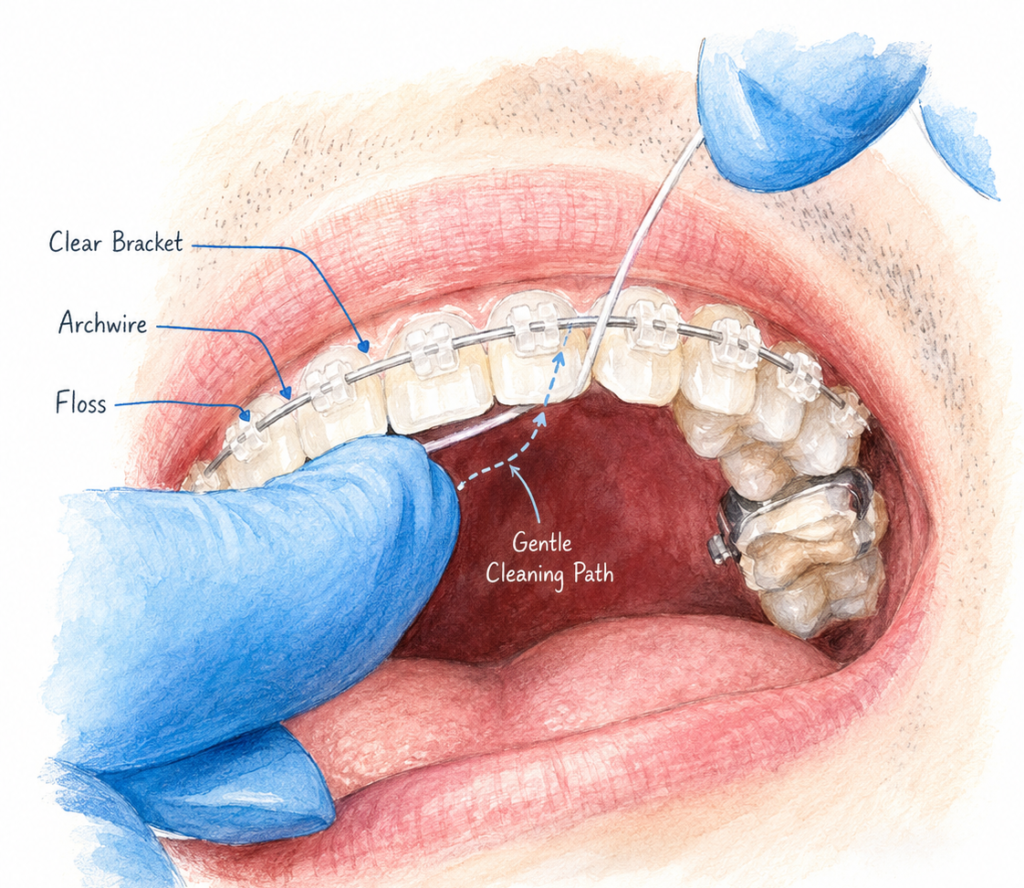
Improving oral hygiene habits after braces is a realistic goal for many people. During treatment, flossing around wires and brackets required specialized tools and patience, and many patients found it difficult to maintain perfect hygiene. After removal, standard flossing and brushing is straightforward. Building a thorough, consistent oral hygiene routine after braces comes off is an excellent time to cement good habits.
Protecting the retainer is a practical concern. Removable retainers should be stored in their case when not in the mouth, never wrapped in napkins where they can be accidentally thrown away. They should be cleaned daily with a soft toothbrush and water, avoiding hot water which can warp the plastic. Regular retainer check appointments with the orthodontist confirm that the retainer still fits correctly and that the teeth are stable.
Long-term post-braces care priorities:
Long-Term Care After Braces Removal
| Priority | Action Required | Frequency |
|---|---|---|
| Retainer wear | Wear full-time initially, then switch to nights only as advised. | Daily, lifelong |
| Dental checkups | Get a professional examination and cleaning. | Every six months |
| Oral hygiene | Brush twice daily and floss once daily. | Daily |
| Retainer cleaning | Brush the retainer gently with a soft toothbrush and water. | Daily |
| Retainer check appointments | Confirm retainer fit and tooth stability. | Annually or as recommended |
| Whitening maintenance | Optional whitening touch-ups if desired. | Once or twice yearly after initial treatment |
Final Thoughts on the Braces Removal Appointment
Getting your braces off is one of the most exciting appointments in orthodontic treatment, and now you know that it is more than just a quick pulling-off of metal. It is a carefully performed clinical procedure that typically takes between forty-five minutes and two hours, involves several distinct steps, and requires skill and precision to complete safely.
Understanding what happens during debonding, what affects the length of the appointment, what to expect in the days afterward, and how critical the retention phase is helps patients approach this milestone with realistic expectations and genuine appreciation for the process.
The actual removal of the brackets is just the beginning. The weeks and months after removal, during which enamel recovers, retainers are worn consistently, and new oral hygiene habits are built, are what ultimately determine how beautiful and stable the final result will be for years to come. Every bit of time and effort put into this final phase of treatment protects the results of all the months or years of treatment that came before it.